A Ring Group is a destination designed to distribute calls to a group of team members. An example is to have an option on the auto-attendant that routes calls to a sales ring group.
Things to know about Ring Groups:
- Calls can be set up to ring on all extensions at the same time, ring in sequence, or in a particular order.
- Ring groups can be set to ring more than one phone at a time.
- Ring groups are better used with accounts that have more than one extension and/or phone. These help determine where calls will go first and in which order they will happen.
How to create Ring Groups?
- Log in to the Customer Portal with an account that has Admin/PBX access
- From the Dashboard find and click on the Settings icon. Alternatively, from the top menu bar, find and click on the PBX option.
- Once the page loads, find the Ring Groups Tab and click on it.
- On the right-hand side, you will see a green "CREATE NEW" button, click on it to create a new Ring Group.
- Add a "NAME" to identify your new Ring Group.
- On the "NUMBER" enter an available extension number that will serve as a "speed dial" option to connect to your new ring group, and direct calls to said ring group.
- Next, on the "TYPE" option, click on the dropdown menu to choose how you want the ringing process to happen.
- RINGALL: rings all extensions in a ring group.
- CYCLE: rings all extensions in the ring group cyclically.
- SEQUENCE: rings all extensions in the ring group in the desired sequence.
- RINGALL-LOOP: rings all extensions in a ring group and repeats the same ringing loop until answered.

- Once the Type option has been selected for the Ring Group, the next step is to add the "EXTENSIONS" that you wish to connect to this ring group. (You can add as many extensions as the ones available on a specific account to the new ring group.)
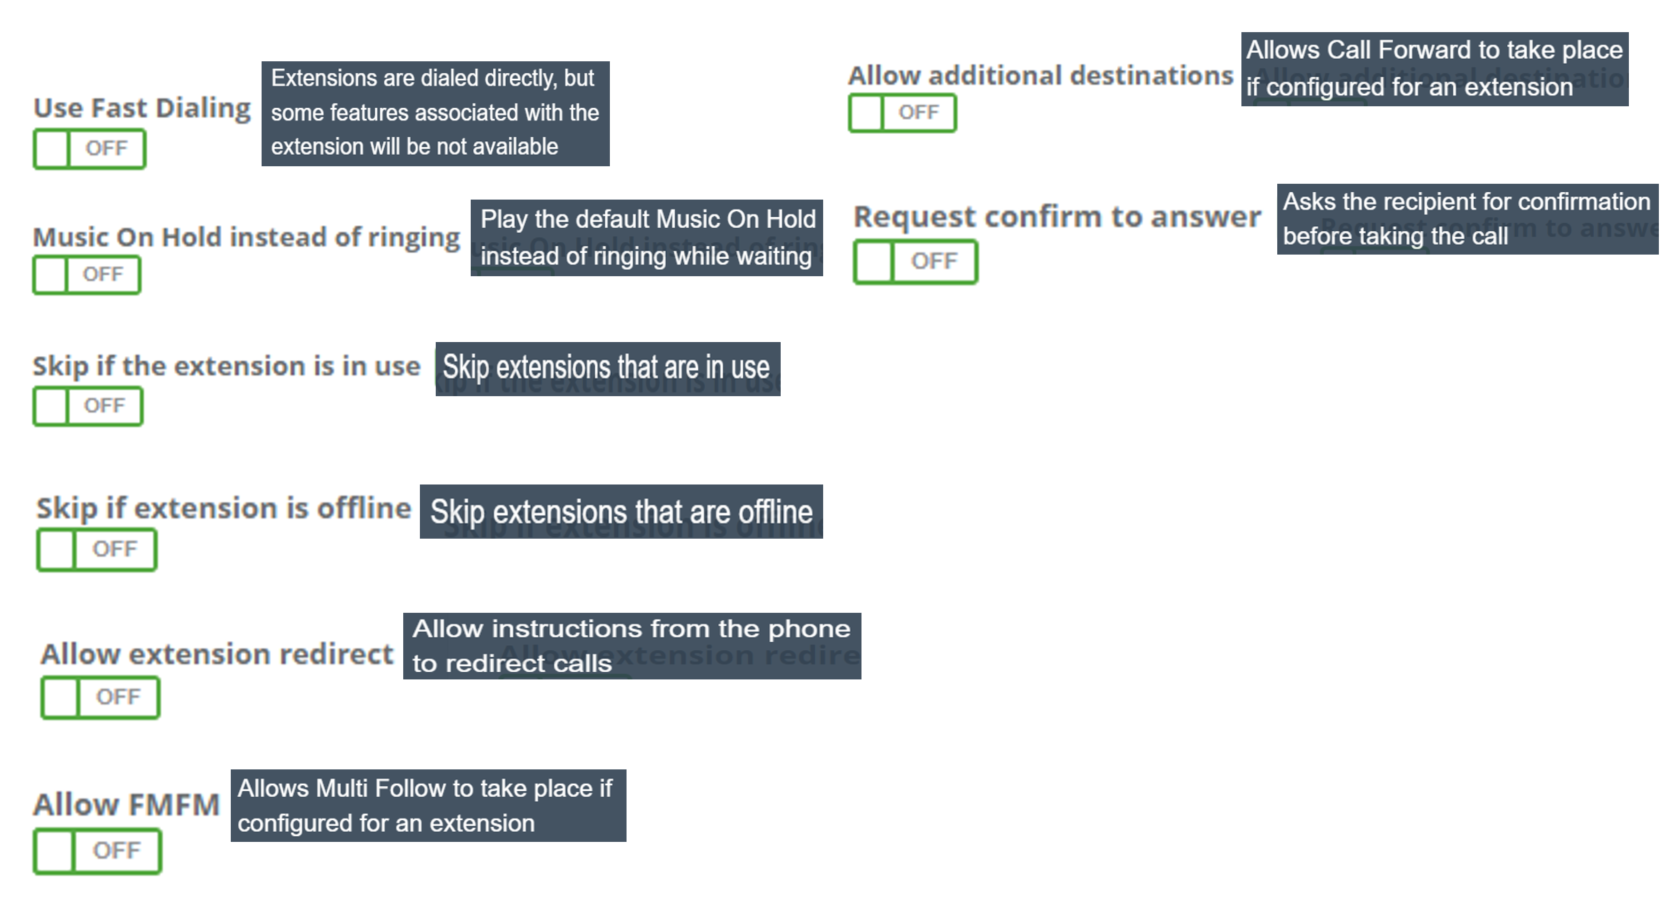
- Then you can proceed to add additional instructions for the new ring group by enabling or turning on the options below. For example, if an extension is currently in use or the extension is offline, you can program it so when a call is diverted to this ring group it will automatically skip said extension.
- Then you will set the extensions "Ring Time". The most used is 30 seconds, which equals 5 rings before the system offers additional options to the caller or the call disconnects if it is not answered.
- Then click on "SAVE & CONFIGURE".
Selecting your "TIME OUT" options:
The time-out options will define what happens to a call if no one in the ring group picks it up if the ring time set ends.
- Once the Ring Group is saved, find it in the ring group's page and click on the "EDIT" pencil icon.

- Scroll down and find the "TIME OUT" Options
- Click on the drop-down arrow for the "TIME OUT" options and you will be able to choose one of the following types of time outs:
- Extensions: Sends call to chosen extension
- Conditions: Sends the call to a designated time condition. I.E. Holiday/Office Closed.
- Auto-Attendant: Sends the call to a specific IVR. I.E. After-hours IVR.
- Ring Groups: Sends the call to another ring group.
- Voicemail: Sends the call to a voicemail. I.E. Receptionist Voicemail.
- Media files: Plays recorded message/greeting from saved media files. I.E. Main IVR.
- Custom Forward: Sends calls to an external custom number, such as a mobile number.
- Special: This adds a special IVR menu feature where calls are sent if no one in the ring group answers. I.E. Dial by name directory.
- Once chosen your preferred time-out option, click on "SAVE".
Note: If no "TIME OUT" option is selected after the ring time is done, the call waiting will end and drop the caller.
How to manage/edit an existing Ring Group?
- Log in to the Customer Portal with an account that has Admin/PBX access
- From the Dashboard find and click on the Settings icon. Alternatively, from the top menu bar, find and click on the PBX option.
- Once the page loads, find the Ring Groups Tab and click on it.
- Find the ring group you want to manage and click on the "EDIT" pencil icon.

- When the page loads you will have all the edit options available for this ring group and can proceed to make any changes as needed.
- When done make sure to click on SAVE, for changes to be applied.
Note: If you changed something in error and wish to reverse it back to the original setting, click on the "BACK" button instead of "SAVE."
How to delete a ring group?
- Log in to the Customer Portal with an account that has Admin/PBX access
- From the Dashboard find and click on the Settings icon. Alternatively, from the top menu bar, find and click on the PBX option.
- Once the page loads, find the Ring Groups Tab and click on it.
- Find the ring group you wish to delete.
- On the far right from the ring group you will see the "DELETE" trash can icon, click on it to delete.
- Alternatively, you can click on the "EDIT" pencil icon and, from the edit screen click on the "DELETE" button in the top right.
