Note: This guide can be used for models T54W, T57W and T53W.
Identifying the phone buttons
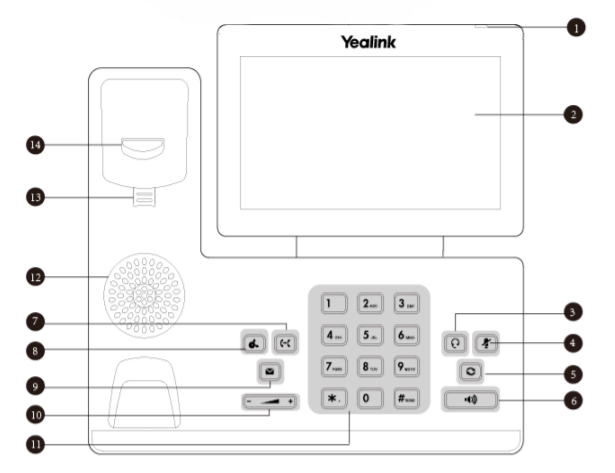
1. Power LED Indicator – Indicates call status, message status and phone’s system status.
2. Touch Screen – Allows you to select items and navigate menus on the touch-sensitive screen. Tap to select and highlight screen items. Shows information about calls, messages, time, date and other relevant data.
3. Headset Key – Toggles and indicates the headset mode. The key LED glows green when headset mode is activated.
4. Mute Key – Toggles and indicates mute feature. The key LED glows red when the call is muted.
5. Redial Key – Redials a previously dialed number
6. Speakerphone Key – Toggles and indicates the hands-free (speakerphone) mode. The key LED glows green when the hands-free (speakerphone) mode is activated.
7. Transfer Key – Transfers a call to another party.
8. Hold Key – Places a call on hold or resumes a held call.
9. Message Key – Accesses voice mails.
10. Volume Key – Adjusts the volume of the handset, headset and speaker.
11. Keypad – Provides the digits and special characters in context-sensitive applications.
12. Speaker – Press to conduct a conference call.
13. Reversible Tab – Secures the handset in the handset cradle when the phone is mounted vertically. For more information on how to adjust the reversible tab, refer to Yealink Wall Mount Quick Installation Guide for Yealink IP Phones.
14. Hookswitch – Picking up the handset from the handset cradle, the hookswitch bounces and the phone connects to the line. Laying the handset down on the handset cradle, the phone disconnects from the line.