Setting up your GreenLink Mobility Suite App
Procedure
- On Android phones open the Google Play
 app. On IOS phones open the App Store
  app.
app. - Look for the SEARCH icon and with your phone's keyboard write "GreenLink Softphone" and tap to search.
- Allow for the download to complete.
- Once done, tap on OPEN on your phone's screen to launch the GreenLink Softphone App. Alternatively, you can navigate to the home screen on your device and look for the GreenLink app.

- You will need to agree to certain phone permissions to make and receive phone calls, view contact information, access audio and accept the License Agreement. Some additional but not essential access options will be given to you for battery optimization and allowing call heads to show over other apps while in a call.
- Open your email and look for an incoming email with the subject "GreenLink Customer Portal Account".
- Copy the USER ID from the email, go back to the GreenLink App Login screen and paste it on the Username area.
- Repeat the previous and copy the password, go back to the GreenLink App Login screen and paste it on the Password area of the screen.
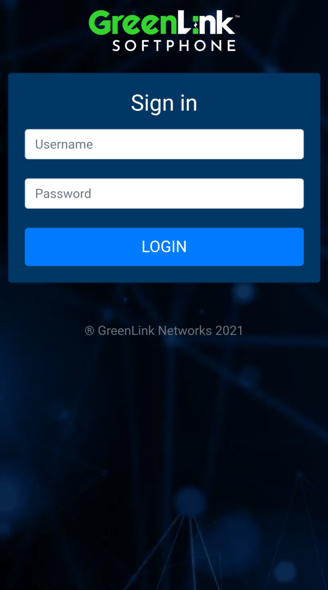
- Once done tap on the LOGIN button.
- If the information entered is correct the softphone app will log in successfully and take you to the Dial-Pad screen.
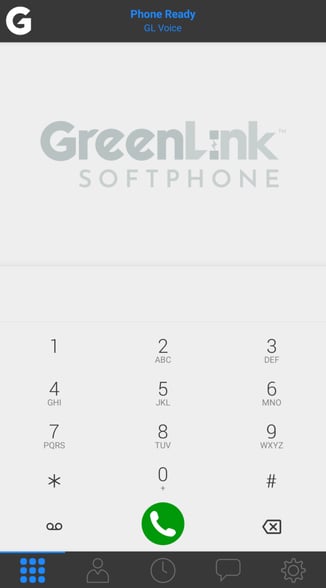
- From the Dial-Pad screen you can start making calls to internal extensions and external numbers, as well as receiving calls from both.
Similar to the GreenLink Softphone on the Desktop App you will have, from left to right, the Dial-Pad, Contacts, Call History, Messages/Chatting Rooms, Settings at the bottom of your Mobility Suite Softphone App as shown on the image below.

Similar content: